Task Example 0: Hello World!
Introduction
This example illustrates tfollowing Golem features & aspects:
- VM runtime
- Task execution
- Retrieving command output from provider's exe unit
Prerequisites
The only assumption made in this article is that you have some familiarity with basic Golem application concepts. Here's a good starting point to learn about these: golem-application-fundamentals
Here are the prerequisites in case you'd like to follow along and/or experiment with the code presented in this article:
you have a local
yagnanode set up (instructions can be found here: Yagna installation)you have the Python API set up on your machine (see instructions in: Run first task on Golem)
Golem's APIs rely heavily on coroutines and asynchronous execution (async/await). If you're unfamiliar with these concepts, chances are you'll find some parts of the code examples confusing.
If you'd like to learn more about async/await, here's a good introduction to Python's generators and coroutines: https://mleue.com/posts/yield-to-async-await/
Although the blog post is focused on Python, most of the concepts presented there are still relevant for other programming languagues which support async/await.
Requestor agent code
Let's jump straight to the example:
This example uses the standard VM runtime.
#!/usr/bin/env python3
import asyncio
from typing import AsyncIterable

from yapapi import Golem, Task, WorkContext
from yapapi.log import enable_default_logger
from yapapi.payload import vm


async def worker(context: WorkContext, tasks: AsyncIterable[Task]):
    async for task in tasks:
        script = context.new_script()
        future_result = script.run("/bin/sh", "-c", "date")

        yield script

        task.accept_result(result=await future_result)


async def main():
    package = await vm.repo(
        image_hash="d646d7b93083d817846c2ae5c62c72ca0507782385a2e29291a3d376",
    )

    tasks = [Task(data=None)]

    async with Golem(budget=1.0, subnet_tag="public") as golem:
        async for completed in golem.execute_tasks(worker, tasks, payload=package):
            print(completed.result.stdout)


if __name__ == "__main__":
    enable_default_logger(log_file="hello.log")

    loop = asyncio.get_event_loop()
    task = loop.create_task(main())
    loop.run_until_complete(task)
That's all we need in order to run a task on Golem!
How does it work?
Here's the flow diagram of all the interactions that need to happen between the requestor and the provider(s) in order for a task to be completed:
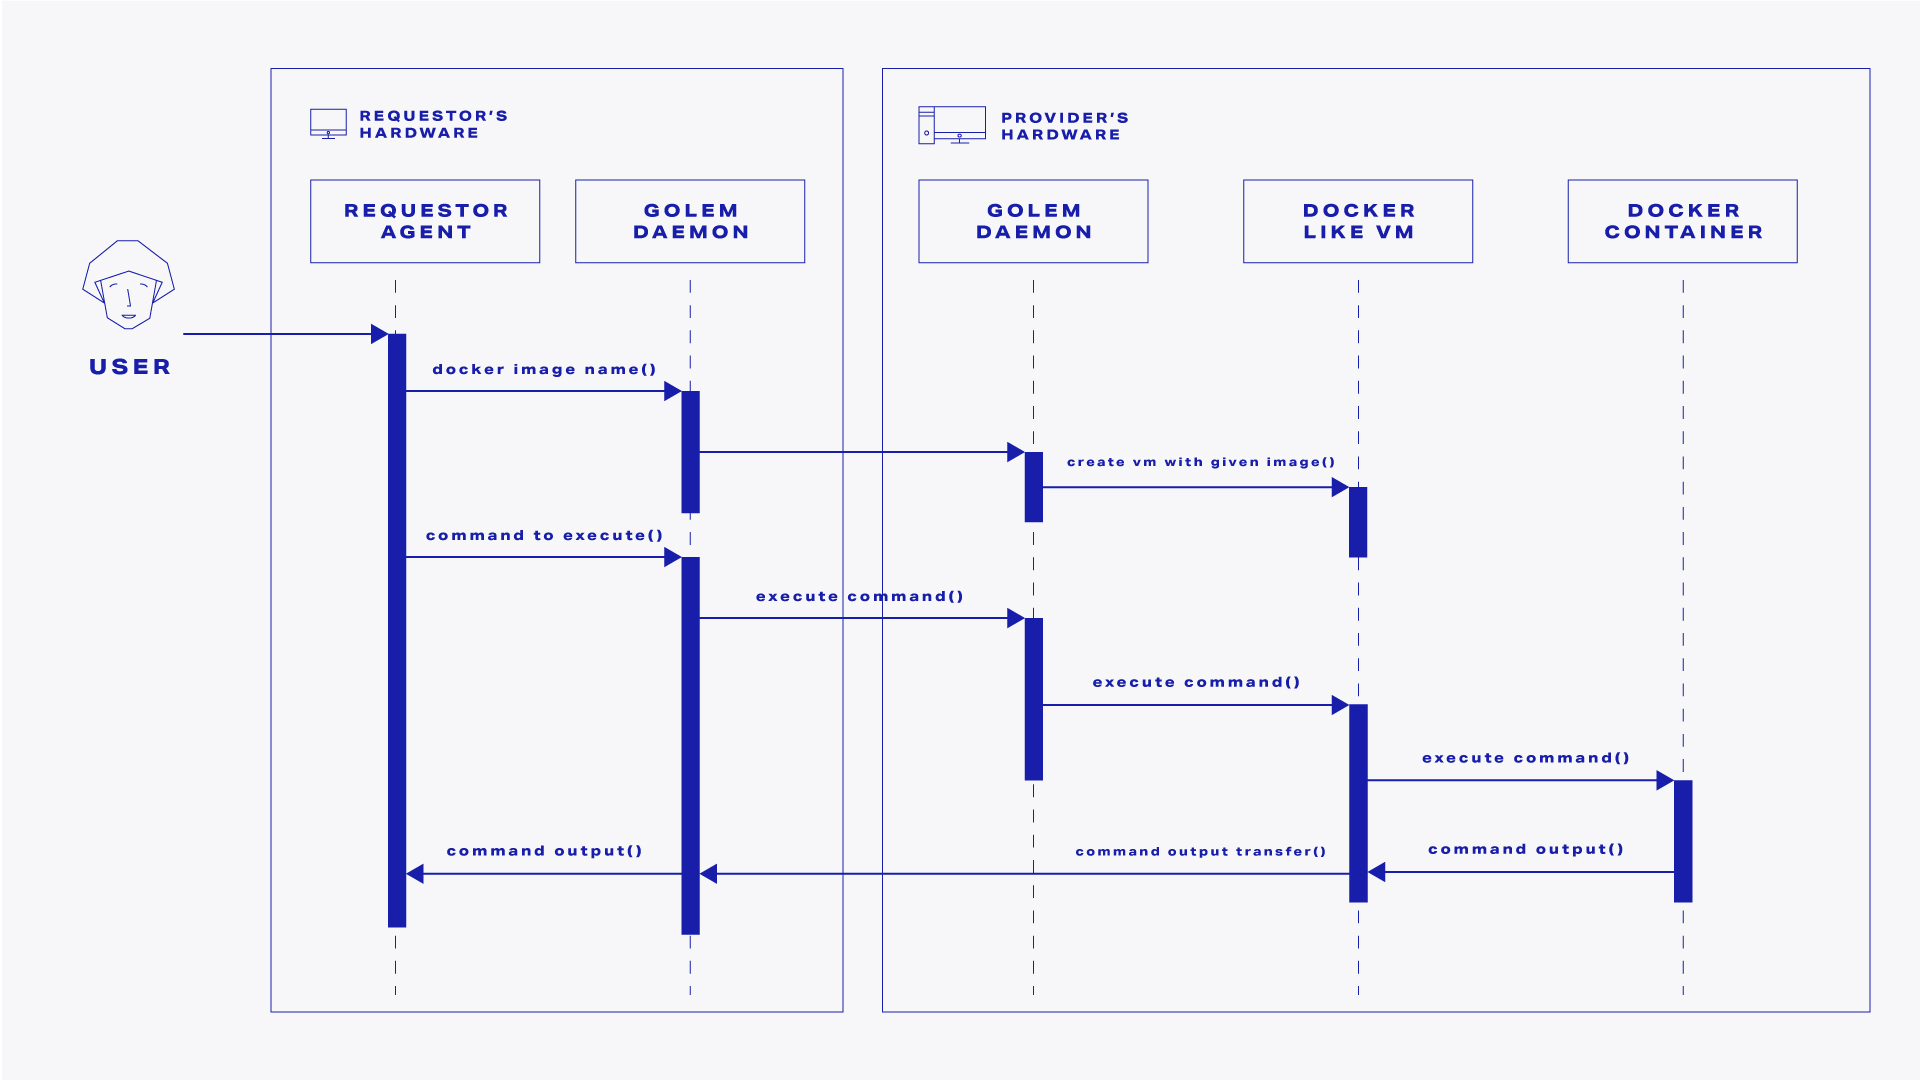
From a high-level perspective, a successful run of the above program performs the following steps:
- A single task is scheduled to be executed in the Golem network
- Once a suitable provider is found in the market, a lightweight VM is launched on that node
- When the execution environment is ready, the requestor's script is run inside it
- Once the script is finished, the result is retrieved from the provider and displayed to the terminal
In this minimal example our script consists of a single command: the Linux date utility. This program returns a string representing the system's current time, e.g.: Tue Jun 8 14:53:51 UTC 2021.
Let's move on to exploring our example code!
The main() function
This function is our program's entry point and it performs three steps:
- Specifying the VM image to be launched by providers
- Defining an array of
Taskobjects to be computed - Creating a
Goleminstance and using it to execute our tasks
VM image
package = vm.repo(
    image_hash="d646d7b93083d817846c2ae5c62c72ca0507782385a2e29291a3d376",
)
Currently, Golem is using a public repository to store both official and community-authored VM images. Once an image is uploaded to this repository it can be referred to by its hash.
This is what we're making use of here - by using the function repo from vm, we're getting a payload definition for our providers. The only input we must provide at this point is the image hash. In the case of this example we're using a pre-uploaded, minimal image based on Alpine Linux.
If you'd like to learn about creating and uploading Golem images yourself, take a look at this guide: Golem images
Tasks array
tasks = [Task(data=None)]Next comes the array of task fragments to be computed. For simplicity, our tasks array contains a single item of type Task which has no data associated with it. This means we only need a single item to be computed and that the worker function does not need any additional parameters.
In general, each Task object refers to a single piece of computation within your app and typically holds some data. For example, in a program which operates on a huge file, a single Task could be holding one chunk of that file to be processed by one of many providers involved.
To see a more involved example of this take a look at: Task Example 1: Simple hash cracker (this links to a section on task fragments)
Golem/Executor
async with Golem(budget=1.0, subnet_tag="public") as golem:
    async for completed in golem.execute_tasks(worker, tasks, payload=package):
        print(completed.result.stdout)
Finally, as the last step of our main() function we create an instance of Golem (or Executor in the case of JS API) and use it to request our tasks.
Golem/Executor is the heart of Golem's API - it handles communication with the local Golem node, processes payments for completed tasks and, most importantly, provides an easy way of requesting resources in the Golem network.
Instantiation
Let's first focus on the instantiation code:
async with Golem(budget=1.0, subnet_tag="public") as golem:
    ...
Our context manager needs to be declared asynchronous as its setup and teardown functions are coroutines. This is required since they involve some long running actions such as creating/deleting payment allocations or starting/stopping background services.
Alternative usage pattern (Python)
Note that aGolem instance can also be used without a context manager, but rather can be started and stopped explicitly:
golem = Golem(budget=1.0, subnet_tag="public")
await golem.start()

# ...execution code here...

await golem.stop()
As for the parameters passed to the Golem constructor:
budgetspecifies our desired budget (in GLM) for the total cost of all tasks computed using thisGoleminstance.subnet_tagspecifies the name of a Golem network subnet we'd like to use for all Golem communication performed by thisGoleminstance.
Execution
async for completed in golem.execute_tasks(worker, tasks, payload=package):
    print(completed.result.stdout)
Having a Golem instance initialized we can now request some tasks!
The execute_tasks function used here takes three parameters:
workeris the function which defines the steps that should happen for each provider node in order to process aTasktasksis the array ofTaskobjects we have createdpayloadis the payload definition for providers which we created using thevm.repofunction
execute_tasks returns an asynchronous iterator of Task objects, hence the async for statement. Items returned by this iterator are successfully completed tasks in the order they were computed.
Having a completed task we can inspect its result. The result's structure will depend on the execution environment we used. In our case it's the VM runtime and so the result contains the output of your executed command in stdout.
The worker() function
async def worker(context: WorkContext, tasks: AsyncIterable[Task]):
    async for task in tasks:
        script = context.new_script()
        future_result = script.run("/bin/sh", "-c", "date")
        yield script
        task.accept_result(result=await future_result)
The worker function is what defines the interaction between our requestor node and each provider computing one or more of our tasks. It's called once per provider node with which our requestor has struck an agreement.
This method follows the "work generator" pattern. If you're unfamiliar with it in the context of Golem you can learn more in this article: Work generator pattern and WorkContext
WorkContext gives us a simple interface to construct a script that translates directly to commands interacting with the execution unit on provider's end. Using this object we can schedule commands such as transferring files, running programs etc.
The sequence of Task objects yields task fragments assigned to this provider. In a more complex scenario each Task object would be carrying its own piece of data to be used during computation.
In the case of this example our entire script consists of a single command which is the call to script.run. This means that, once yielded, the provider's exe unit will receive an instruction to make a call to /bin/sh -c date.
Commands run with script.run are not executed in any shell. This means you have to either specify the full binary path or run the command through a shell manually (for example: /bin/sh -c ...).
By awaiting on future_results after the script has been yielded, we ensure the results are available and unwrap them from the awaitable object.
Finally, we make a call to task.accept_result to mark the task as successfully finished and pass it the result object. This will cause our task to be passed to the queue of completed tasks which gets processed in our main function.
All done!
That's all there is to the example!
To run it on your local machine make sure you have a yagna node running and set up as a requestor (take a look here in case of any doubts: Yagna installation). You can then issue the following command to create an app-key:
yagna app-key create requestorYAGNA_APPKEY={your_appkey_here} ./hello.pyThis assumes you're in the directory which contains the hello.py file. You'll also need to provide your node's actual app key. If everything went fine you should see a log similar to the one below:
[2021-06-15 14:51:22,951 INFO yapapi.summary] Agreement proposed to provider 'someone'
[2021-06-15 14:51:23,319 INFO yapapi.summary] Agreement confirmed by provider 'someone'
[2021-06-15 14:51:24,159 INFO yapapi.summary] Task started on provider 'someone', task data: None
Tue Jun 15 12:51:24 UTC 2021

[2021-06-15 14:51:27,643 INFO yapapi.summary] Task finished by provider 'someone', task data: None
[2021-06-15 14:51:27,643 INFO yapapi.summary] Computation finished in 6.7s
Tue Jun 15 12:51:24 UTC 2021 is the result we received from executing the date command inside our provider's exe unit.
Ready for a more complex scenario? Take a look at the next article which implements a rudimentary hash cracker using Golem network.
Was this helpful?