Golem Migration Guide
In this tutorial, we will guide you through the Golem Network Token migration process. We have 3 options available for you to be able to migrate. We hope you find the options fairly simple and intuitive, and with this tutorial, you should be fully ready and feel more confident to migrate your GNT to GLM, the new token. Please take your time and make sure that you have read our FAQs.
Option 1: Migrating with our Web Application via MetaMask
Sidenote: We chose the Metamask for our migration application. You can easily import any Ethereum address into this wallet, and it supports multiple accounts. Most importantly, you can easily use your hardware wallets with it. You will also be able to migrate with MyCrypto once their widget is ready, with MyEtherWallet and script when we’ve concluded the mainnet test.
See video on YouTube:
There are three paths available for you to migrate your GNT to GLM with our Web Application via MetaMask:
- Migration from an Ethereum address (shown in the video above)
- Migration from the Golem app with an additional Ethereum account
- Importing your Golem keys to Metamask
The first two migration paths are pretty straightforward and intuitive. The third one, even though rather simple as well, has some limitations that should be considered before deciding to go forward. Please be advised, that if you want to continue using Clay Golem (that supports only old GNT) - you will need to create a new account, as the one you are migrating from will no longer be usable and compatible with the Clay Golem token standard.
Safety first!
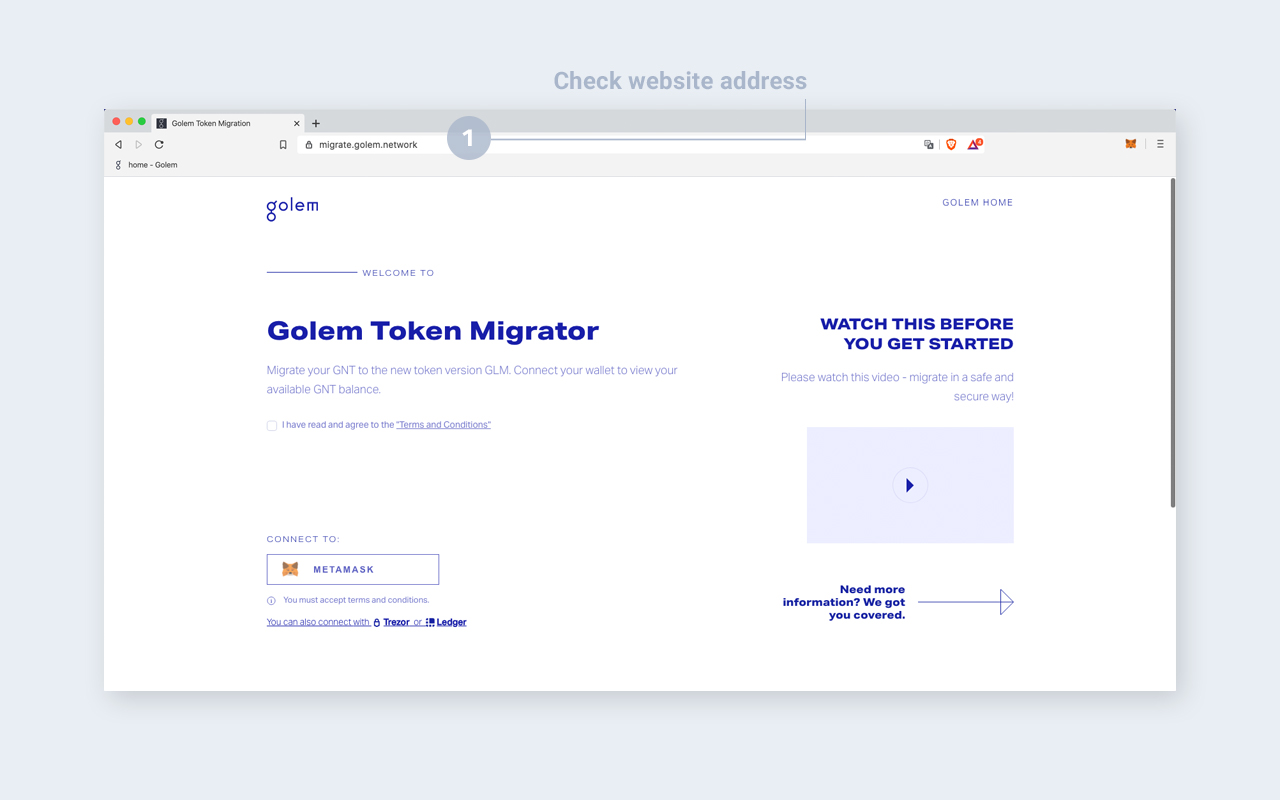
The first thing you want to do is check the website address and the SECURITY CERTIFICATE (green padlock symbol next to the address). Please check this every time you visit the migration website just to avoid falling into scams such as duplicate sites. The address should say migrate.golem.network, and the certificate (green padlock symbol) should verify this.
Path 1: Migration from an Ethereum address
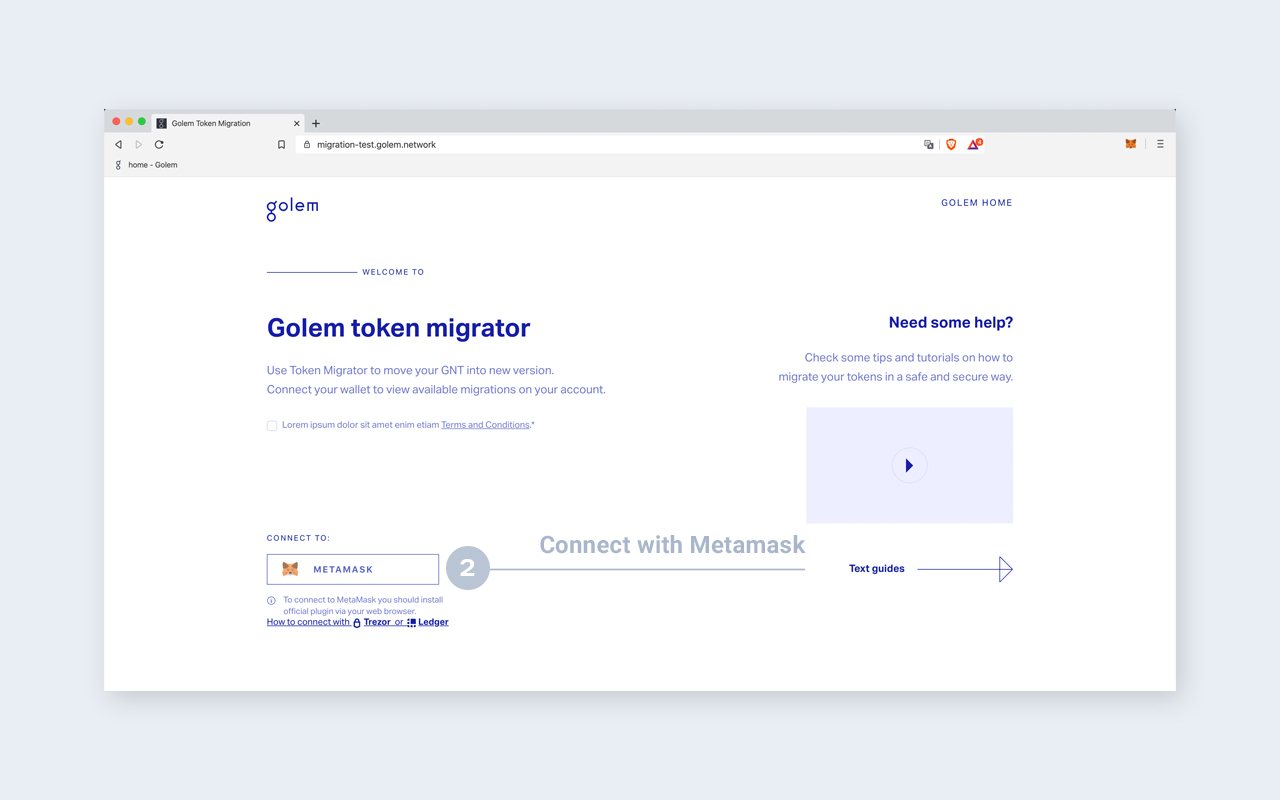
To use Golem’s migration tool you will be asked to accept its terms and conditions. Without such permission, we will not be able to support you in executing token migration. After agreeing to the terms and conditions, you should connect the migration tool with your Metamask account (2).
The Metamask window will pop up. Please, make sure you are using the correct network (Ethereum Mainnet (3)) and that you are connecting to the right account (4). Now, confirm the connection between the migration tool and Metamask (5).

This way you get the migration tool connected to your Metamask account.
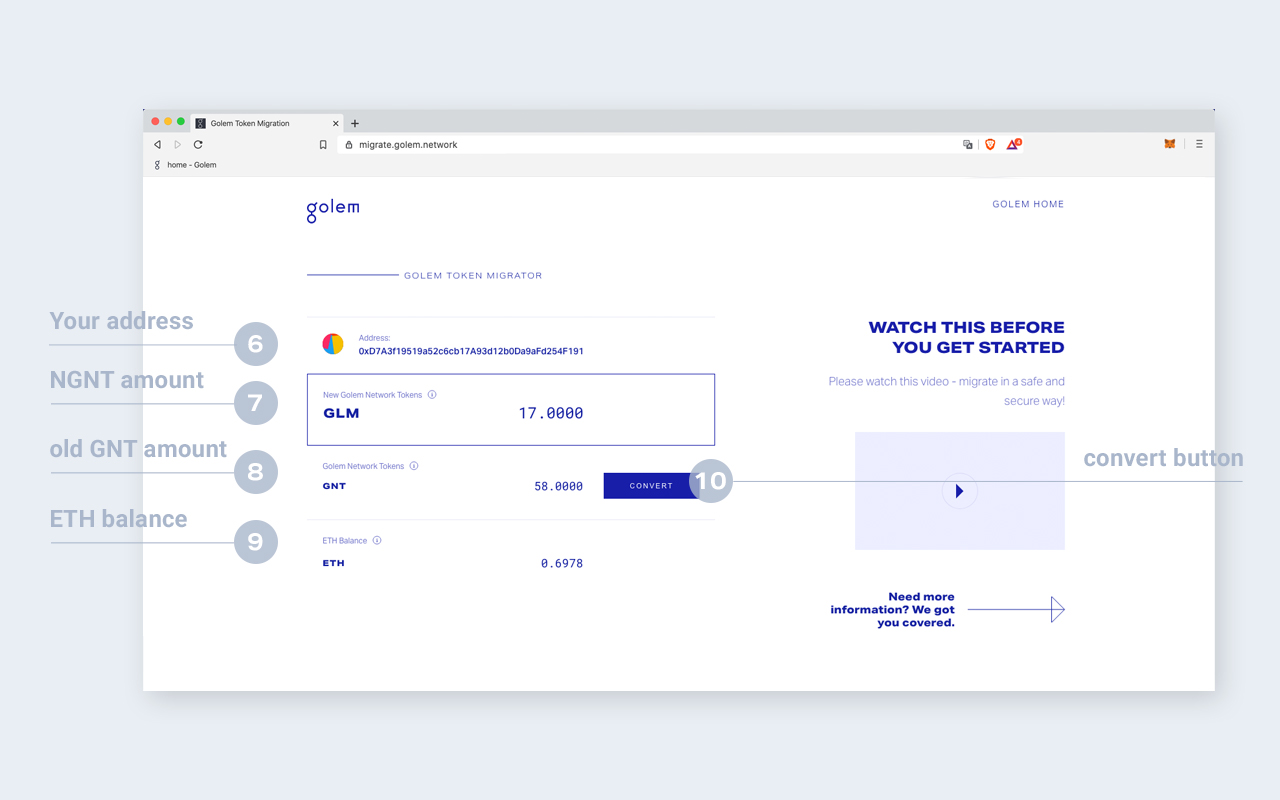
The information that will be presented after connection of the migration tool and your Metamask is your personal address, the amount of GLM (the new token) already at your disposal (when connecting for the first time the amount will be 0 as you have not proceeded with the migration yet), your balance of old GNT tokens and also ETH balance. Please bear in mind that as we are using Ethereum, some ETH is needed to pay for transaction fees in the network. A small amount should be absolutely sufficient to execute your migration process.
To check current gas prices visit Ethereum Gas Tracker.
Now, that you know what are the balances of your assets and the migration tool is effectively connected to your Metamask, you are ready to go through migration itself!
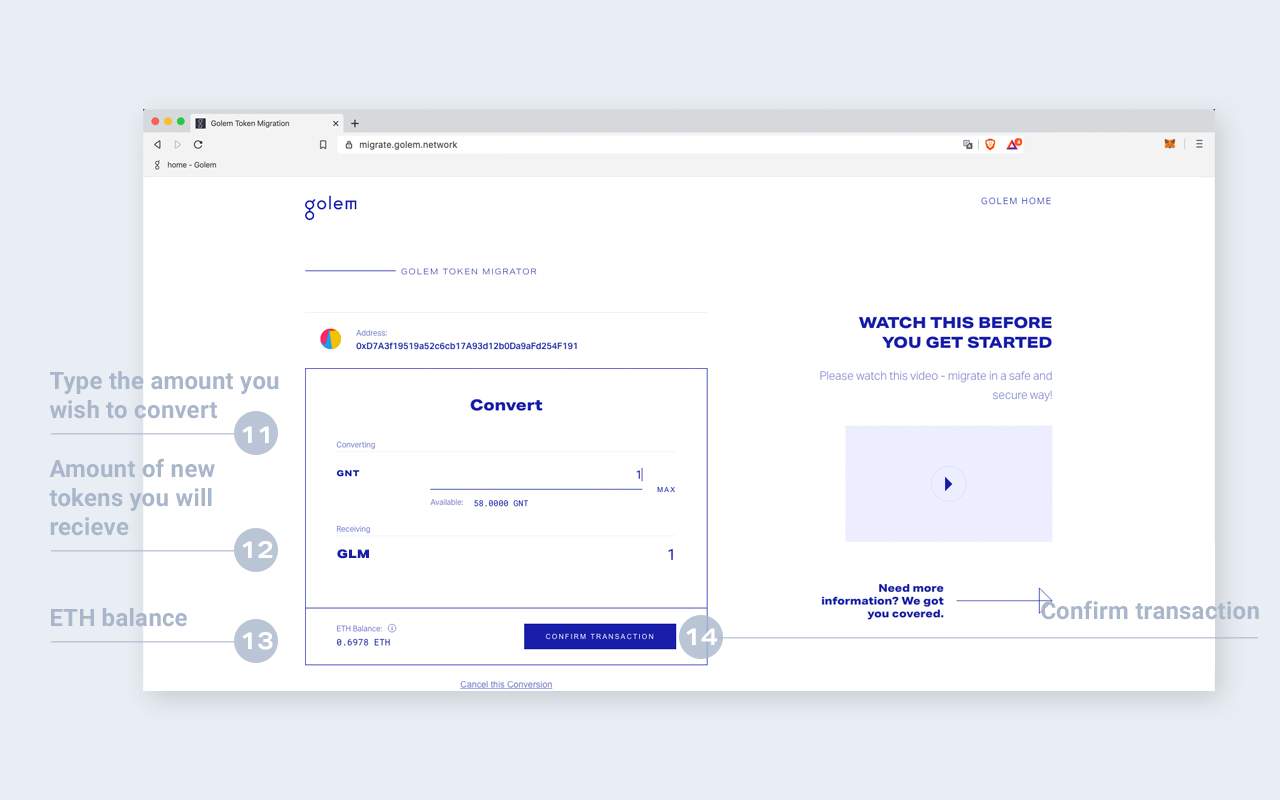
- First, type in (11) your desired amount of tokens to migrate. If this is your first time performing a migration, we suggest doing the operation with a small amount to test if the migration process works properly without risking losing a large portion of your assets.
- After typing in the required amount, the tool will present you the amount of the new GLM tokens that you will receive (12) in exchange for the specified amount of old GNT tokens.
- The exchange rate is 1:1. The tool will also check if you have the required amount of ETH to perform the transaction to the smart contract.
- If you have the ETH and selected the amount of the old GNT, and are sure that the amount you typed in is correct, then click the Confirm transaction button (14).
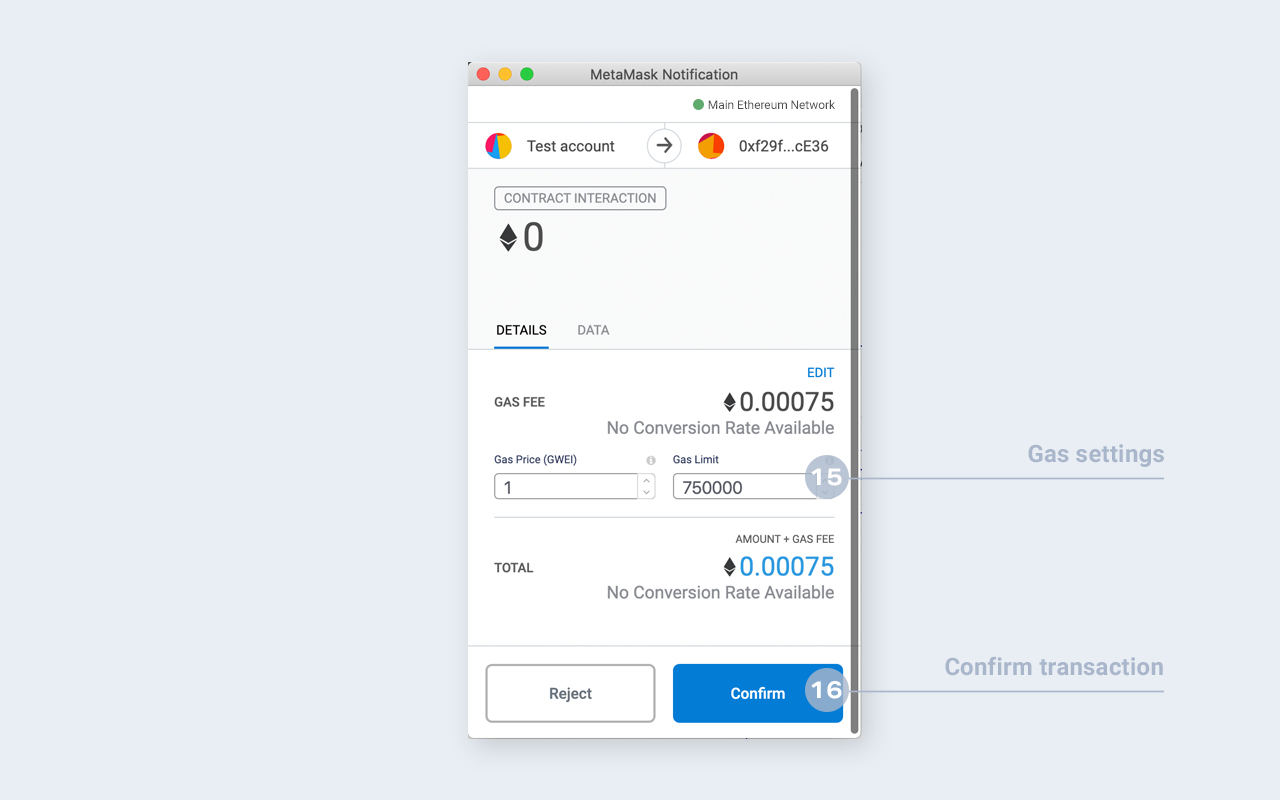
- The Metamask window will pop up again for you to confirm the transaction. In this step, you can also adjust the transaction fee (15) to make your transaction mine quicker or choose a more budget-friendly but slower approach to the execution of your migration process. To do so, just type in the required amount expressed in GWEI in the “gas price” window.
- After all the adjustments and amounts are correct, please confirm the transaction (16). Default values set by Metamask are optimal in most cases. However, if you are keen to adjust them manually, please make sure to include reasonable amounts. If you’re not sure what the current gas prices are then we recommend checking Ethereum Gas Tracker and input amounts based on the current network state.
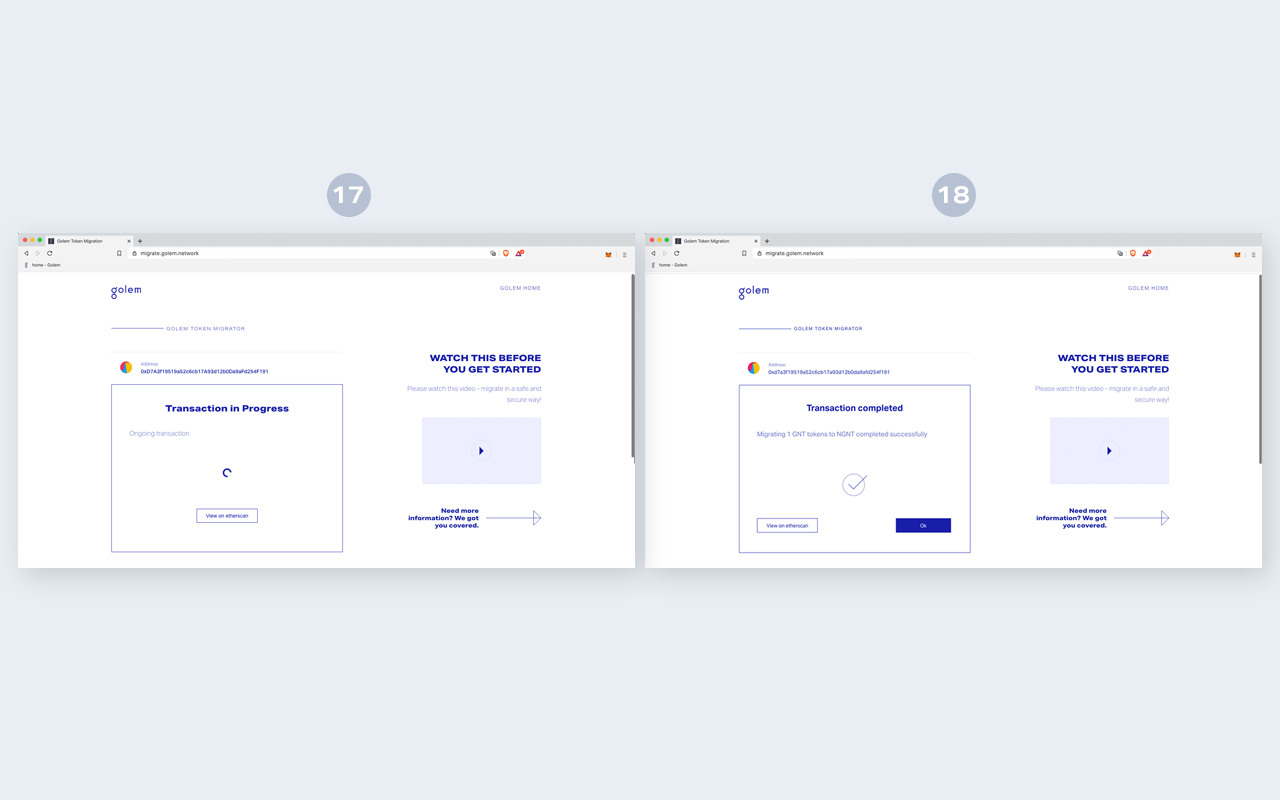
Depending on the chosen gas price you might have to wait a while for the transaction to be mined, but as soon as it is completed you will be presented with the modal confirming the successful completion of your transaction(18).
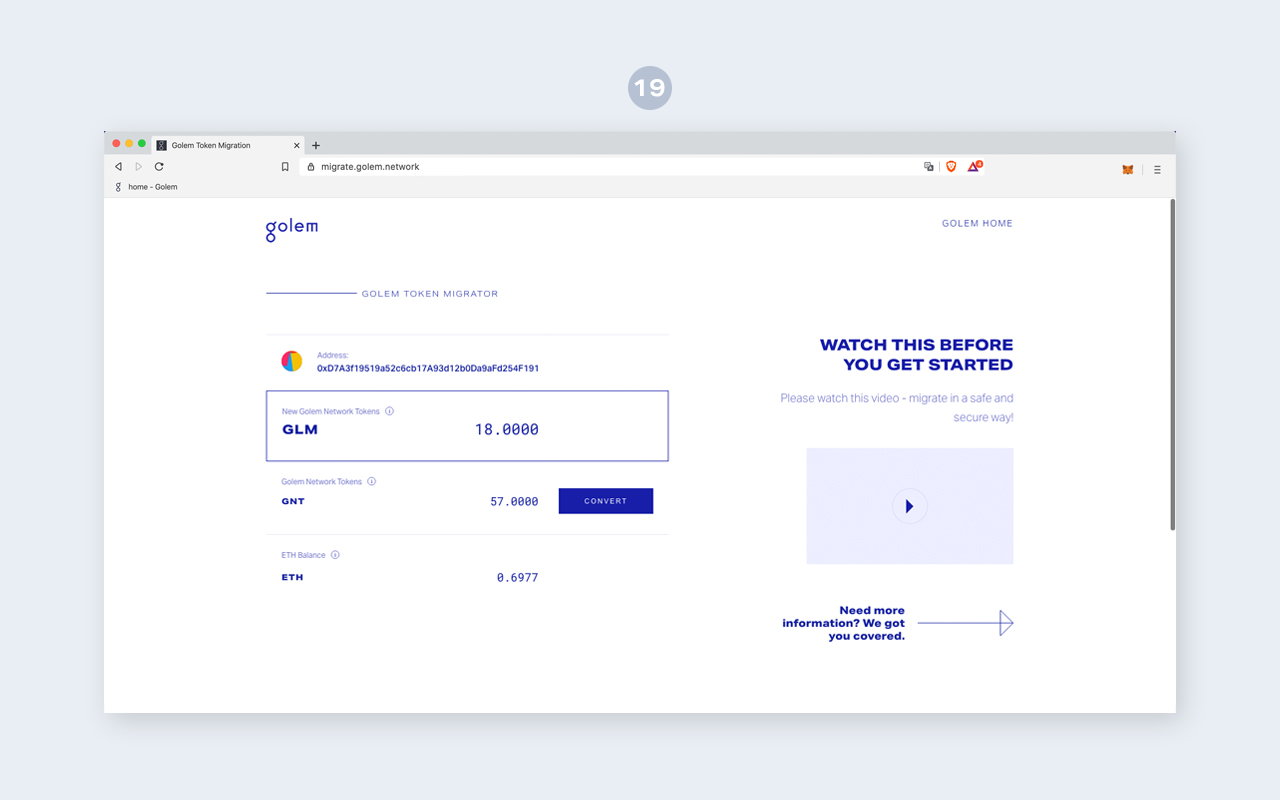
Congratulations! You’ve managed to migrate your old GNT tokens successfully. The updated amount of GLM (19) will be reflected in your account balance.
Path 2: Migration from the Golem app with an additional Ethereum account
In case you decide to migrate your tokens directly from the Golem app before you start, please make sure to deactivate the Consent Service first, and unlock the deposited funds.
?> Please, be advised that for security reasons and to mitigate possible attacks, all deposits from the app are time-locked for 48 hours in a "pending withdrawal". So, if you choose that approach remember to take care of unlocking your deposited funds with enough time reserve before planned migration. After 48 hours since the deposit unlock order, you will be able to withdraw all funds from your main GNT account.
Now, that you have all your funds unlocked and available, please open your Golem app:
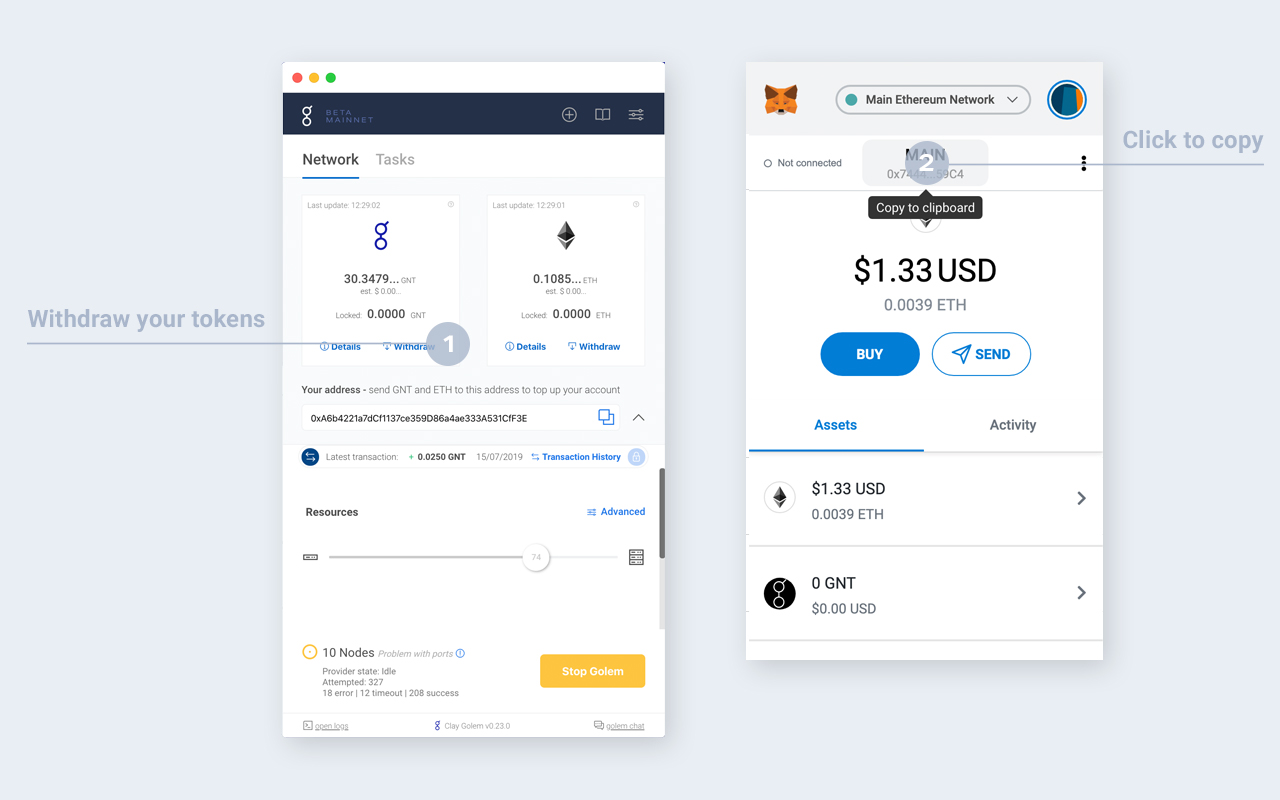
If you are using the Golem GUI then expand the wallet window and click the “Withdraw tokens” button (1).
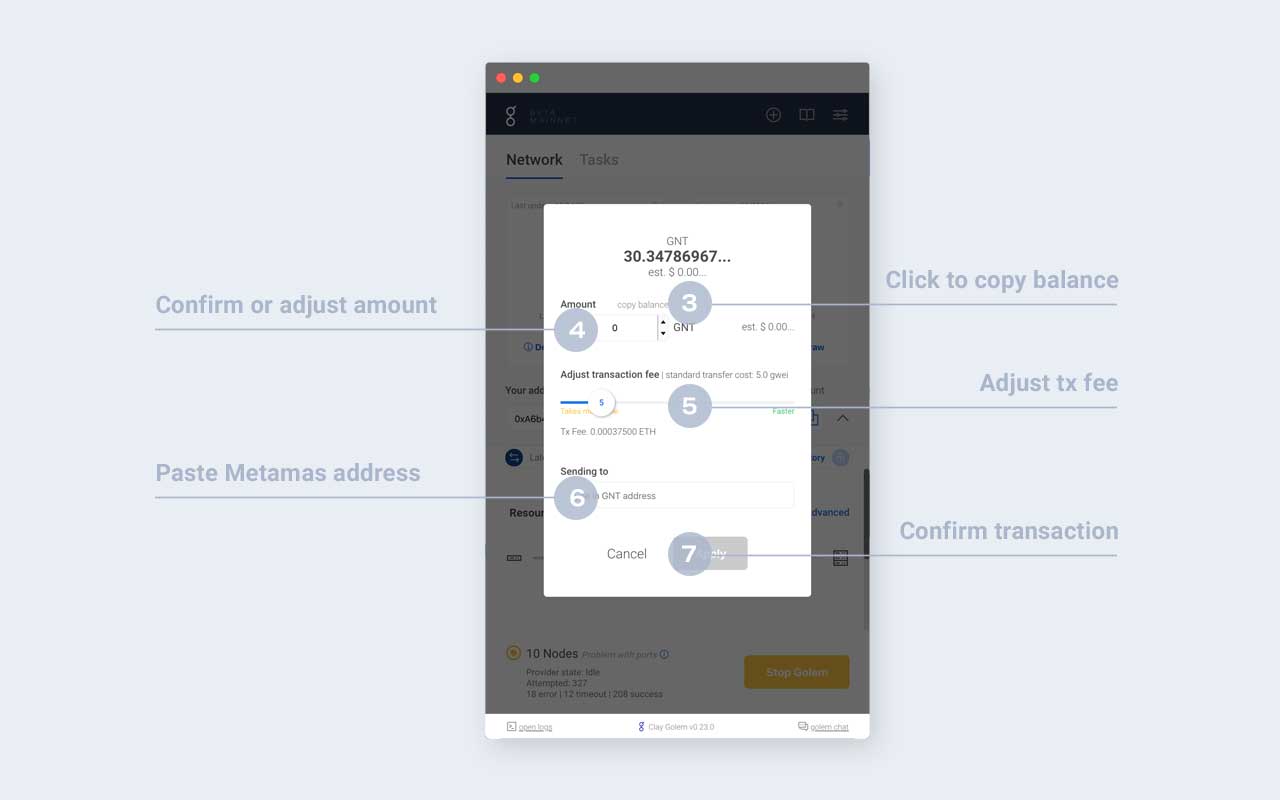
In the withdrawal window, you can put the requested amount, either by adjusting the amount or typing it by hand (4). It can reflect your overall balance or just part of it, depending on how much of the old GNT you would like to migrate.
The next step is to adjust the transaction fee of your withdrawal (5). Remember, that to do a withdrawal you will need some amount of ETH on the account you are making a transaction from (in this case the Golem App wallet).
Go to your Metamask app, and copy the Ethereum address that you are going to use to migrate the old GNT tokens (2). You Paste the address that you have copied from the Metamask in the “Sending to” field in the Golem App (6).
The final (7) step is to confirm the transaction. The summary window will pop up for you, to be able to double-check the address and the amount that you are sending.
For the next steps, follow this link.
Return to the Golem App.
Path 3: Importing your Golem keys to Metamask
!> Important: Please bear in mind that the Clay Golem app only supports the old GNT. Should you choose to import your Golem app keys to Metamask, after the migration of your old GNT, if you decide to continue using Clay Golem you will be required to create a new account, as the one you’ve imported keys from will no longer be usable.
One more thing you need to take into consideration when choosing this approach is the fact that the Golem app uses GNTb tokens (wrapped tokens used for batched transactions to decrease the cost of transaction fees). To execute your migration process, you will have to unwrap those tokens directly in the migration app before moving to the migration process itself.
Having this in mind we’d recommend withdrawing the old GNT tokens to the external address synchronized with the Metamask, as this conversion is being done by Golem automatically during the withdrawal (please see the Migration from the Golem app with an additional Ethereum account section above).
If your choice of approach is still to import your Golem keys to Metamask, you should go to the Golem directory, where you can find a file called keystore.json. It contains your private key connected to this account, encrypted with the password you configured when running Golem for the first time.
Your wallet keys can be found in your app directory. The locations of the app directories for each supported OS can be found in the description below:
Windows: %LOCALAPPDATA%\golem\golem\default\mainnet (or \rinkeby for testnet)
MacOS: ~/Library/Application Support/golem/default/mainnet (or /rinkeby for testnet)
Linux: ~/.local/share/golem/default/mainnet (or /rinkeby for testnet)
Importing the account into Metamask can be done in a few simple steps:
- Click your account’s icon
- Select “Import Account”
- Change the “Select Type” option to “JSON File”
- Click “Choose file” and point Metamask to the keystore.json file mentioned above
- Enter your Golem password in the “Enter password” field.
Done! Your account is imported into Metamask. The next steps of migration are described here.
Option 2: Migrating with MyCrypto
You also have the option to migrate your old GNT to GLM using the MyCrypto migration tool - in this way, you can connect MetaMask and WalletConnect, you also have the option to connect your Trezor or Ledger hardware wallet. Follow the steps below and also feel free to head over to the MyCrypto blog.
Notes before you get started:
- If you have no accounts connected to app.mycrypto.com, you'll need to connect one first.
- You'll get a notification to migrate if you have any accounts with GNT.
- No update of any sort is required -- you may need to do a hard refresh of the site to clear the cache if you don't see the update.
- Look for the GNT migration notification or find the "Your Action Items" section on the left to begin.
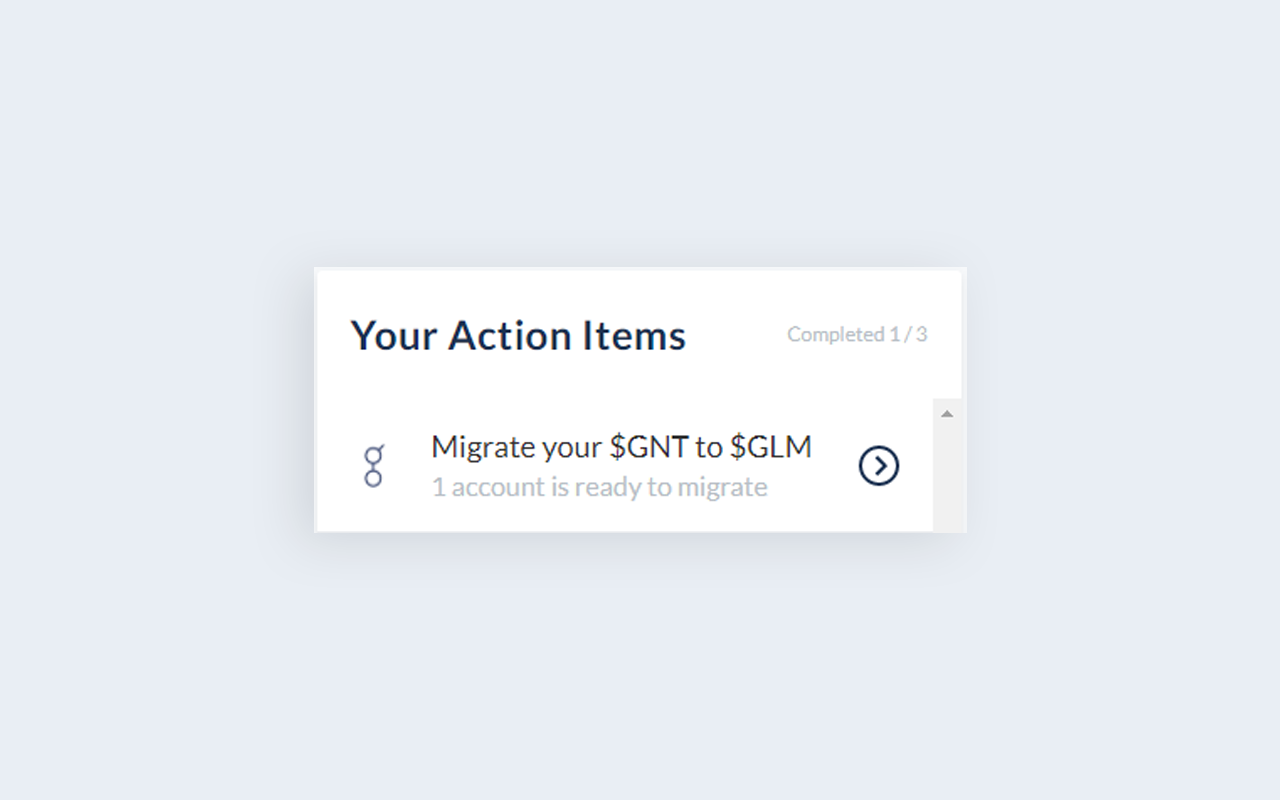
- In the "Migrate your GNT to GLM" section, click on Migrate.

- Select the amount of old GNT that you wish to migrate to GLM and click Migrate Golem Tokens.

- See the details of your transaction and click Confirm and Send.
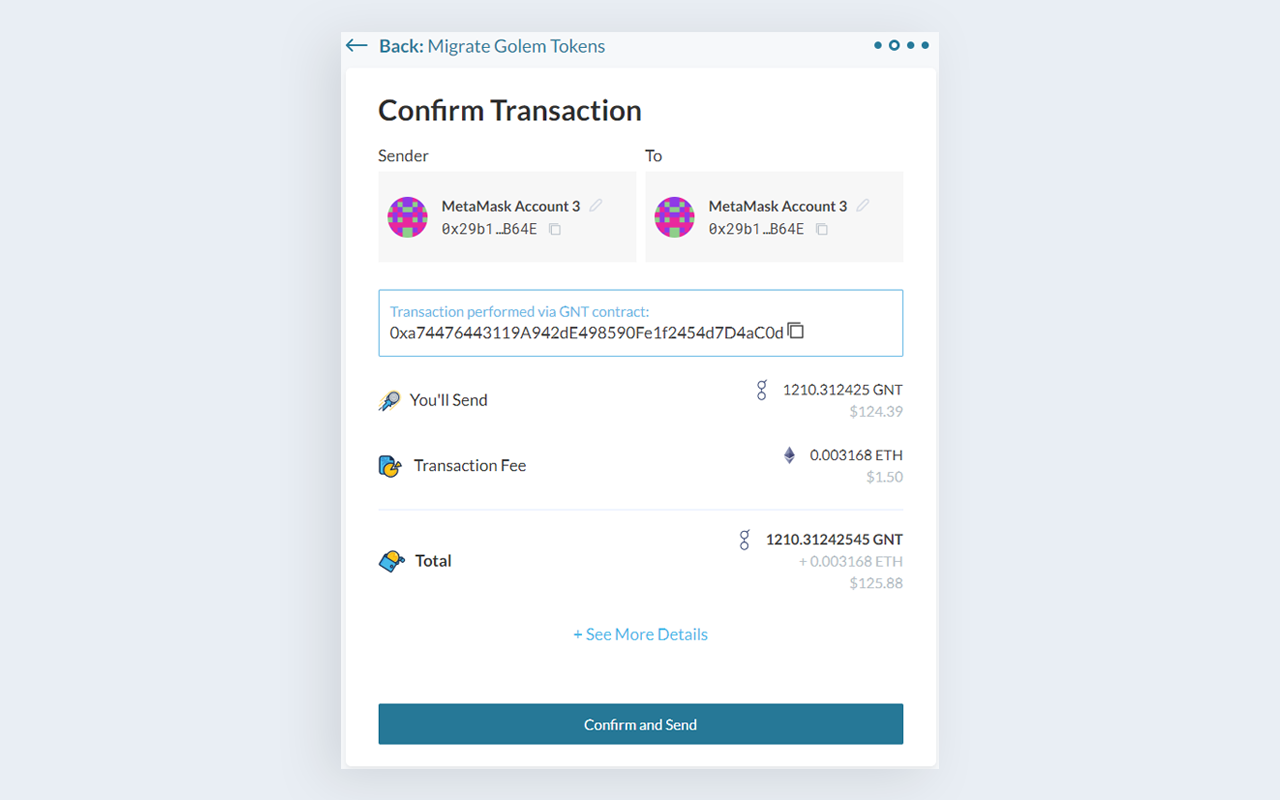
That's it! You will just need to confirm the transaction on whichever method you're connected to MyCrypto and you've successfully migrated your GNT to
Option 3: Migrating with MyEtherWallet
Go to MyEtherWallet V5. After connecting your wallet, on the main landing page "Dashboard" you will need to scroll to the DApps section and click "View All", here you will see "Golem Migrator - Migrate your old golem tokens today" in the DApps section.
Select how much GNT you wish to migrate to GLM (remember that migration is one-way, once you've migrated the GNT is burned).
Confirm the transaction and make sure you set an appropriate gas price.
//: <> ( usually the default provided is suitable but you can also check Ethereum Gas Tracker
Congratulations, you've now migrated your GNT to GLM!
Option 4: Migrating with our Automated Script
This alternative for migration is not recommended for regular GNT users and holders. It should only be used by exchanges or other custodians with proper security protocols and engineering teams. Following this migration process without the proper experience will risk the loss of tokens. If you are not confident that this migration alternative is for you then use the regular migration application.
Requirements
This script can be used to migrate tokens from the old GNT to GLM tokens. To run the script, you need to have Node.js 10 or newer installed.
Usage
Setup project
git clone https://github.com/golemfactory/gnt-migration-script.gitcd gnt-migration-scriptnpm install
To run the script you will need to set two environment variables: RPC_URL: HTTP URL to an Ethereum node (e.g. infura) PRIVATE_KEY: Private key of the account holding old GNT tokens 4. Running RPC_URL="..." PRIVATE_KEY="..." npm run migrate will send the migration transaction
Development
To run tests, simply run npm test
GLM Migration exchange support
If you’re storing your GNT in any of the following exchanges, there is no action required. They have expressed interest in migrating tokens on their user’s behalf. You do not need to migrate the tokens by yourself, we would recommend that you give your exchange time to organize and wait for an announcement. Larger exchanges will likely take longer to organize so please be patient.
If you have any questions, we suggest you contact them directly as they might be better positioned to answer your doubts. You always have the option to migrate tokens yourself.
Migration FAQ
What is the GLM Token Contract Address?
0x7dd9c5cba05e151c895fde1cf355c9a1d5da6429. Do not send tokens directly to this address.
I don't see my GLM in MetaMask, where is it?
You might need to add the new GLM token. You can use this quick add link or add the token address: 0x7dd9c5cba05e151c895fde1cf355c9a1d5da6429
I'm holding GNT on an exchange. Do I need to do something?
Here you can see the list of exchanges supporting the migration. If your exchange is not listed we suggest you contact them directly. If you’re storing your GNT in any of the following exchanges, there is no action required.
Which L2 will be used?
We have zkSync working on Testnet - our next release will already be riding L2! (test still, but L2!)
I tried to convert my GNT but the process was never successful. I had enough gas.
Gas has been especially unfriendly, I'd advise you to migrate on the weekend when gas is usually lower.
I'm trying to convert my GNT with Ledger
Check if you have "allow contract data" set to "Yes" on your device. Without it, the transaction will fail.
I do not see GLM on Ledger Live
That is correct. Ledger will support the GLM token appearance in December. If you see GLM tokens on etherscan then you are safe.
I'm holding GNT for the long haul. Should I migrate?
Yes, you need to migrate. Basically, the old token won't be supported in our new platform which we will soon launch into mainnet, therefore the token will lose its utility and subsequently, stop being supported by exchanges - which will cause it to depreciate. In short, it will die down. The good thing is the migration does not end, and it's 1:1 so you have plenty of time to do it without any issues, neither depreciation nor paying high gas prices, etc. So read the guide, watch the tutorial, and migrate when you see gas at a decent price at the Ethereum Gas Tracker.
Was this helpful?