Requestor in browser Quickstart
Introduction
In most of our examples, we demonstrate how to run a requestor script in Node.js. However, you can also run your scripts in a browser context. This example will explain how to do it.
Setting up the project
Install Yagna
On Linux/MacOS, you can install it using our installation script:
curl -sSf https://join.golem.network/as-requestor | bash -You might be asked to modify your PATH afterward.
Start the Yagna service
Open a terminal (command line window) and define the app-key that will allow our script to use the Yagna API. In this tutorial, we will use the try_golem app-key, which will be automatically generated and configured when you start Yagna.
export YAGNA_AUTOCONF_APPKEY=try_golemThis creates a temporary app-key that will only be available for this session. If you restart the Yagna service, you'll need to set the YAGNA_AUTOCONF_APPKEY variable again. For production deployment, it is recommended to create a permanent app-key using the yagna app-key create <key-name> command.
Then, start the yagna service: To enable communication between your web application and the Yagna service, you need to start Yagna with the --api-allow-origin flag, specifying the URL where your web application will be served. In this example, we'll use http://localhost:8080.
yagna service run --api-allow-origin='http://localhost:8080'Set up the development environment
mkdir web_golem
cd web_golem
npm install --global http-server
This will install the http-server utility to host our web page, where we will run our Golem app.
Create the HTML page
Now, we'll create the main index.html file with the following content:
<!doctype html>
<html lang="en">
<head>
<meta charset="UTF-8" />
<title>Requestor in browser</title>
<link
rel="stylesheet"
href="https://cdn.jsdelivr.net/npm/bootstrap@5.3.2/dist/css/bootstrap.min.css"
integrity="sha384-T3c6CoIi6uLrA9TneNEoa7RxnatzjcDSCmG1MXxSR1GAsXEV/Dwwykc2MPK8M2HN"
crossorigin="anonymous"
/>
</head>
<body>
<div class="container">
<h1 class="pb-4">Hello Golem</h1>
<div class="row pb-4">
<h3>Options</h3>
<div id="options" class="row">
<div class="col-4 form-group">
<label for="YAGNA_APPKEY">Yagna AppKey: </label>
<input id="YAGNA_APPKEY" class="form-control" type="text" value="" />
</div>
<div class="col-4 form-group">
<label for="YAGNA_API_BASEPATH">Yagna Api Url: </label>
<input id="YAGNA_API_BASEPATH" class="form-control" type="text" value="http://127.0.0.1:7465" />
</div>
</div>
<div class="row pb-4">
<div class="col-4 form-group">
<label for="IMAGE_TAG">Image Tag: </label>
<input id="IMAGE_TAG" type="text" class="form-control" value="golem/alpine:latest" />
</div>
<div class="col-4 form-group">
<label for="SUBNET_TAG">Subnet Tag: </label>
<input id="SUBNET_TAG" type="text" class="form-control" value="public" />
</div>
<div class="col-4 form-group">
<label for="PAYMENT_NETWORK">Payment Network: </label>
<input id="PAYMENT_NETWORK" type="text" class="form-control" value="hoodi" />
</div>
</div>
</div>
<div class="row pb-4">
<h3>Actions</h3>
<div>
<button id="echo" class="btn btn-primary" onclick="run()">Echo Hello World</button>
</div>
</div>
<div class="row">
<div class="alert alert-info" role="alert">
<h4 class="alert-heading">Debugging</h4>
<p>You can see <code>@golem-sdk/golem-js</code> logs in your browser's <code>console</code> :)</p>
</div>
<h3>Results</h3>
<div class="col">
<ul id="results"></ul>
</div>
</div>
</div>
<script type="module">
import { GolemNetwork } from "https://unpkg.com/@golem-sdk/golem-js";
export function appendResults(result) {
const resultsEl = document.getElementById("results");
const li = document.createElement("li");
li.appendChild(document.createTextNode(result));
resultsEl.appendChild(li);
}
async function run() {
// This line allows you to watch golem-js internal logs in the browser console!
localStorage.debug = "golem-js:*";
const key = document.getElementById("YAGNA_APPKEY").value;
if (!key) {
alert("You didn't provide your Yagna AppKey");
return;
}
const url = document.getElementById("YAGNA_API_BASEPATH").value;
const subnetTag = document.getElementById("SUBNET_TAG").value;
const imageTag = document.getElementById("IMAGE_TAG").value;
const network = document.getElementById("PAYMENT_NETWORK").value;
// Define the order that we're going to place on the market
const order = {
demand: {
workload: {
imageTag,
},
subnetTag,
},
market: {
rentHours: 0.5,
pricing: {
model: "linear",
maxStartPrice: 0.5,
maxCpuPerHourPrice: 1.0,
maxEnvPerHourPrice: 0.5,
},
},
payment: { network },
};
const glm = new GolemNetwork({
api: { key, url },
});
glm.payment.events.on("invoiceAccepted", ({ invoice }) => appendResults(`Total cost: ${invoice.amount} GLM`));
try {
appendResults("Establishing a connection to the Golem Network");
await glm.connect();
appendResults("Request for renting a provider machine");
const rental = await glm.oneOf({ order });
appendResults("Rented resources from " + rental.agreement.provider.name);
await rental
.getExeUnit()
.then(async (exe) =>
appendResults("Reply: " + (await exe.run(`echo 'Hello Golem! 👋 from ${exe.provider.name}!'`)).stdout),
);
appendResults("Finished all work with the resources");
await rental.stopAndFinalize();
appendResults("Finalized renting process");
} catch (err) {
console.error("Failed to run the example", err);
} finally {
await glm.disconnect();
}
}
window.run = run;
</script>
</body>
</html>
In this layout, there are three elements:
- An
Optionsform, where you can define input parameters - An
Actionssection with an "Echo Hello World" button, which executes a command on the remote Golem node - A
Resultscontainer, which displays the results
The JavaScript code embedded in the HTML page defines:
- The
run()function that creates the body of the requestor script. - Helper functions that display the results in the browser window.
Run the Script
Launch the web server
Launch http-server in the project folder.
http-serverOpen the application
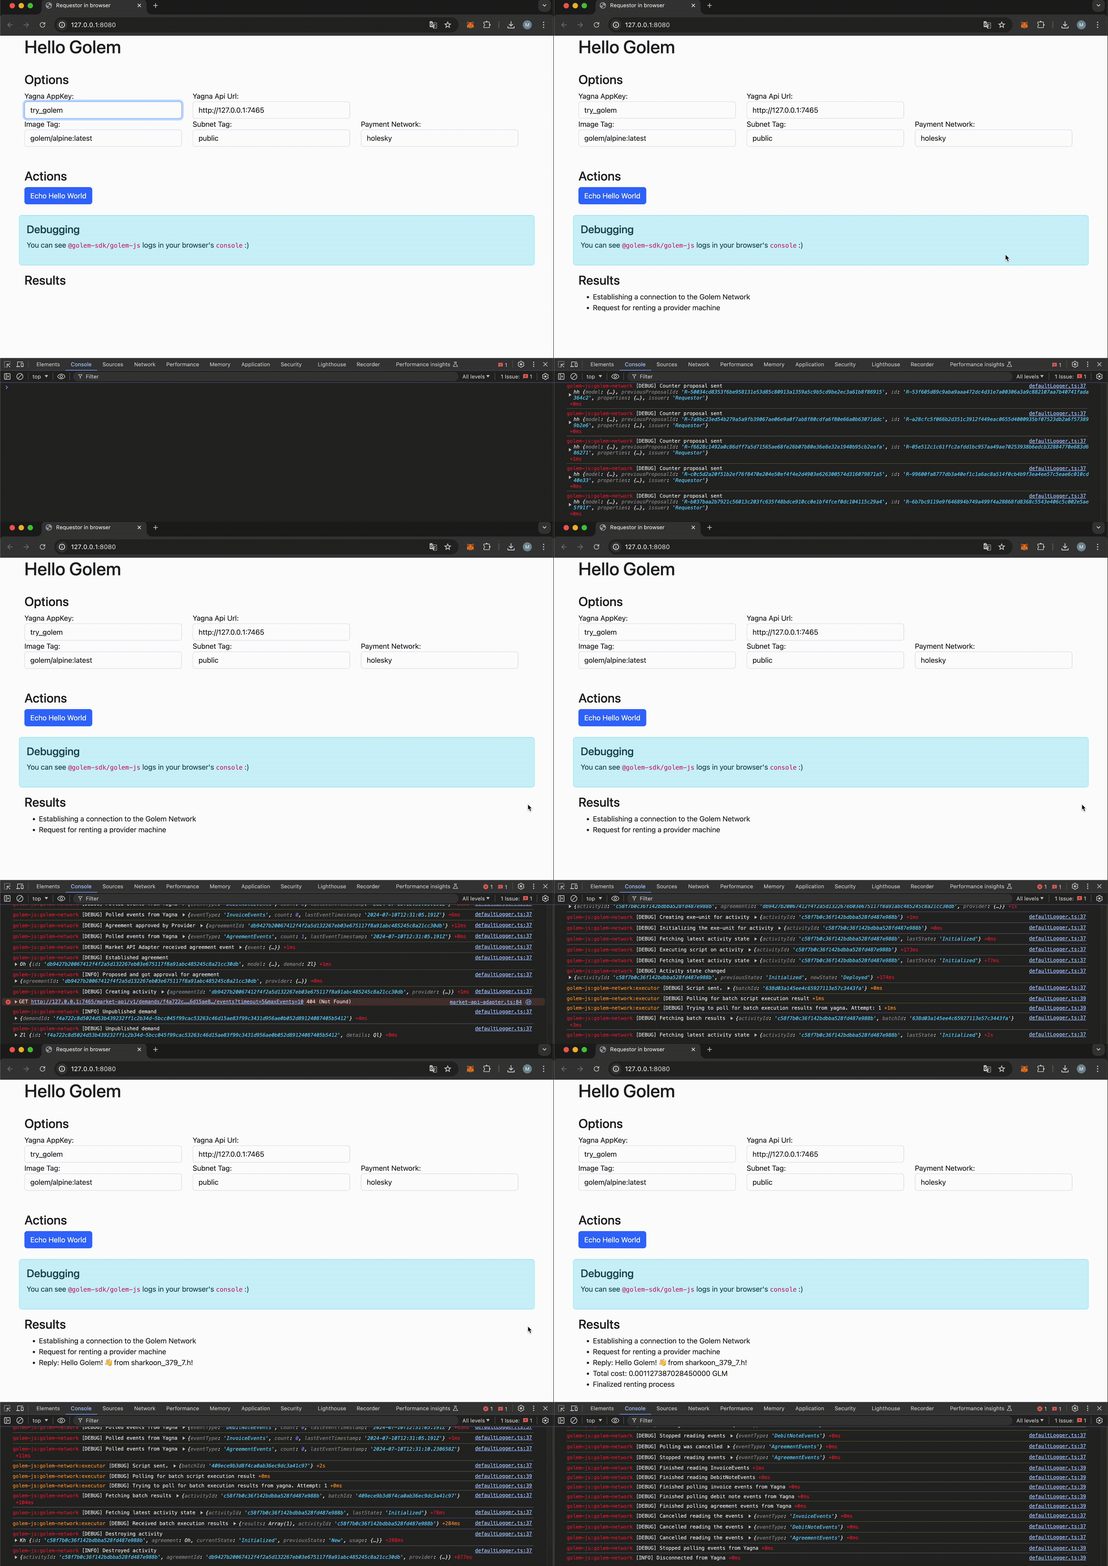
We should now see our app available in the browser at http://localhost:8080/index.
Run the example
If you click the Echo Hello World button, after a while, in the result container, you should get the result of the script:
- The result of executing the script in the Results container.
- Debug logs in the console window.

If, instead of using the temporary try_golem app key defined earlier, you created a unique app key using yagna app-key create <key-name>, make sure to update the app key value in the respective Options field.
Was this helpful?